If you are considering getting a heat pump installed in your Monroe home, you are already thinking in the right direction. Heat pumps cool your home in summer and heat it in winter, all from one system, and they do both jobs more efficiently than a traditional separate air conditioner and furnace setup.
But here is what a lot of homeowners do not think about: a good installation matters just as much as the equipment itself. Two identical heat pump systems in two similar Monroe homes can perform very differently depending on how they were installed. The one that was put in correctly will run more efficiently, last longer, and need fewer repairs. The other one will cost more to operate and break down sooner.
This guide walks you through every step of a professional heat pump installation so you know what to look for before you hire anyone.
What Makes Heat Pump Installation Different from a Standard AC
A heat pump both heats and cools your home. In summer, it pulls heat out of your home and sends it outside. In winter, it does the reverse, pulling heat from outdoor air and bringing it inside. That dual function adds a few steps to the installation that a standard AC does not require:
Emergency heat strips serve as a backup heating source when outdoor temperatures drop low enough that the heat pump needs help. In Monroe, where winter temperatures can drop more significantly than in south Louisiana, having these strips properly wired and programmed is especially important.
The reversing valve switches refrigerant flow between heating and cooling modes and must be tested in both directions at startup.
Thermostat programming is more detailed than for a standard AC. A heat pump thermostat manages the heat pump itself, the backup heat strips, and the defrost cycle.
Defrost mode must be correctly configured so the system can clear ice buildup from the outdoor coil during cold weather. Northeast Louisiana winters can produce sustained cold spells that trigger defrost cycles regularly. Getting this right matters.
Step 1: In-Home Estimate and Load Calculation
Before any equipment is ordered, a trained comfort specialist needs to visit your home. This is not just a formality. It determines whether the system you get actually fits your home.
During this visit, the technician measures your home, checks insulation, reviews your existing equipment, and assesses your ductwork. The critical step is the Manual J Load Calculation, which determines exactly how much heating and cooling capacity your home needs based on its specific characteristics.
Proper sizing is critical in Monroe for two reasons. First, an oversized system short-cycles, meaning it cools or heats too quickly and shuts off before it removes enough humidity from the air. On Monroe’s humid summer days, a short-cycling system leaves your home feeling sticky and uncomfortable. Second, an undersized system will struggle to keep up during the hottest summer days and cannot adequately heat your home during Monroe’s occasional hard freezes.
Never allow a contractor to skip the load calculation. Guessing at system size, or simply matching the old unit, is how homeowners end up with comfort problems that no repair can fix.
Step 2: The Install Team Arrives
On installation day, you should receive a call or text before the team arrives. A professional company will tell you the names of the technicians coming to your home.
When the lead installer arrives, they go through the full scope of work with you before anything begins. This review catches any questions and makes sure the job matches what you agreed to during the estimate.
Step 3: Removing the Old System Safely
All electrical power and gas supply to existing equipment are shut off before any removal begins. This is non-negotiable.
Your old system contains refrigerant that must be captured using a certified recovery machine. The EPA prohibits venting refrigerant to the atmosphere. Every technician who handles refrigerant must hold individual EPA certification.
After refrigerant recovery, electrical connections are cut. A thorough installation replaces both the outdoor disconnect box and the flexible electrical whip at this stage. Reusing old wiring on a new system is a common shortcut that creates reliability problems later.
Step 4: Preparing the Outdoor Pad
Modern heat pump units are larger than older equipment because bigger coils drive higher efficiency. The outdoor pad often needs to be releveled or modified.
The new unit sits on a composite pad designed specifically for outdoor HVAC use. Composite absorbs vibration, does not crack or shift over time, and is built to last the life of the system. Concrete pads shift and crack, especially in northeast Louisiana where the ground can freeze during hard winters, and correcting them later means moving the unit.
Step 5: Removing the Indoor Coil
The indoor evaporator coil sits above or below your air handler and must be removed before the new coil can go in. Depending on your home’s layout, this is either straightforward or more complex.
Monroe homes span a wide variety of layouts, from older craftsman and ranch-style homes to newer construction. Tight utility closets or attic-mounted equipment slow this step down. The sheet metal plenum around the coil may also need to be modified since modern coils are taller than older models.
Step 6: Running New Refrigerant Lines
The two copper pipes connecting the outdoor unit to the indoor coil, called the line set, almost always need to be replaced when a new system goes in. Older refrigerant systems use a different oil than modern equipment. Mixing those oils damages the new compressor over time.
The exception is when lines are buried or enclosed in finished walls and cannot reasonably be replaced, in which case they must be flushed, cleaned, and pressure tested.
New lines should run as straight as possible with as few bends as needed. Each bend adds resistance and reduces efficiency. Lines must be secured every four to six feet and protected from direct contact with metal clamps, which creates a path for corrosion.
Step 7: Setting the New Outdoor Unit
With the pad ready and lines run, the new outdoor heat pump unit is positioned. Before any connections are made, the installer should inspect the unit for any shipping damage. You have the right to know if damage exists and to request a replacement.
Refrigerant lines connect to service valves on the unit. These valves allow future technicians to isolate refrigerant during service calls without losing the full charge, which saves you money on every future repair.
Step 8: Brazing, Pressure Testing, and Deep Vacuuming
This is where the quality gap between contractors is largest, and where the long-term performance of your system is decided.
Brazing permanently joins the copper refrigerant connections using an oxygen-acetylene torch and a silver-based filler rod. During brazing, dry nitrogen must flow through the lines to prevent oxidation inside the copper. Without nitrogen, the inside of your refrigerant lines develops microscopic contamination that shortens compressor life significantly. No nitrogen during brazing is a serious red flag.
Pressure testing follows brazing. The system is pressurized with dry nitrogen and held for at least ten minutes. A drop in pressure means there is a leak somewhere that must be found and repaired before refrigerant is introduced.
Deep vacuuming comes after a clean pressure test. The entire refrigerant circuit is evacuated to remove air, moisture, and contaminants. Moisture inside a refrigerant circuit forms acids that destroy internal components from the inside out. The vacuum must reach 500 microns or lower and hold there. Only after the vacuum holds is refrigerant released.
Many contractors rush or skip these three steps. This is often where the difference between a system that lasts 15 years and one that needs a compressor replacement in 5 years gets made.
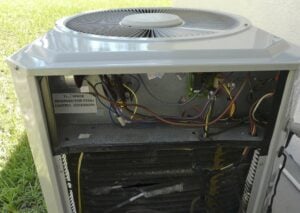
Step 9: Electrical Connections and Emergency Heat Wiring
Heat pump electrical work is more involved than standard AC wiring because of the backup heat and defrost circuits.
A new disconnect box is mounted near the outdoor unit. The low-voltage control wiring between the thermostat and both the indoor and outdoor units must be set up specifically for heat pump operation. This wiring also controls when the backup heat strips engage and when the system enters defrost mode.
Your thermostat must be a heat pump model, not a standard AC thermostat. A heat pump thermostat manages the reversing valve, emergency heat, and defrost cycle in ways a standard thermostat cannot. Using the wrong thermostat is one of the most common installation errors in the industry, and it wastes energy and reduces comfort.
Step 10: Thermostat Programming
Once the correct thermostat is installed, it must be fully programmed for your specific system. This includes:
- The outdoor temperature threshold at which backup heat strips activate (important in Monroe’s colder winters)
- Defrost cycle timing and parameters
- The balance point between heat pump operation and emergency heat
- Any scheduling or smart controls features
A thermostat programmed in five minutes was not done correctly. This step takes time and attention to detail.
Step 11: Condensate Drain Line
When your heat pump runs in cooling mode, it removes moisture from your home’s air. That water drains out through a PVC condensate line that must be correctly sloped, include a trap, and have an overflow safety switch. If the drain ever clogs, the safety switch shuts the system off before water can damage your ceiling or flooring.
Step 12: Startup and Commissioning in Both Modes
Commissioning is the step that determines whether the job was done right. For a heat pump, both heating and cooling modes must be tested.
Your technician should collect and record:
- Suction and liquid line pressures and temperatures
- Superheat and subcooling readings
- Supply and return air temperatures in cooling mode and heating mode
- Voltage and amperage on all motors
- Static pressure across the duct system
- Verification that defrost mode activates and clears correctly
- Verification that emergency heat strips engage at the programmed threshold
- Any refrigerant added
These readings confirm performance within manufacturer specifications and serve as a baseline for future service. A technician who turns the system on, confirms there is airflow, and leaves has not done a commissioning.
Red Flags to Watch For
- No Manual J Load Calculation
- No permit pulled for the installation
- Refrigerant vented rather than recovered
- Old line set reused without flushing and testing
- No nitrogen purge during brazing
- Vacuum skipped or not reaching 500 microns
- Standard AC thermostat installed instead of a heat pump model
- System not tested in heating mode
- Defrost operation not verified
- Old equipment left behind